For his 1st and 2nd birthdays I decided to try my
hands at cake decorating using fondant and gum paste. I made him the same Sesame
Street Cake both times! Oh well, I’m pretty sure he loved them both times.
I tried to get a 3D affect.

Here are some basic steps I took in making the sesame street faces in
case you are keen:
- I downloaded faces from the net or colouring books I have at home. Using MS Word and trial and error I tried to make them all of a similar size.
- Once they were all roughly the same size I printed them out and used tracing paper to copy them on white cardboard. Not too thick.
- I cut out the outline of the faces. There were some faces that required two cut outs, (please see picture below) I was mindful of this when cutting nose, eyes, mouth and eyebrows. This is how it worked for me but you may come up with an simpler method if so please do let me know J

- With a good Sesame Street book on hand I coloured small portions using 50/50 fondant and gum paste blend. I used Wilton colours to colour all fondants. The book helped me get the most accurate colour of the characters.
- I also coloured small portions of red, black, white, pink fondant for eyes and mouth etc.
- I rolled each of the fondant and gum paste blend using the Wilton 9 inch rolling pin with purple guide rings. Then I covered them with freezer bags so it didn’t dry out.
- The tools I used included: Wilton 9 inch rolling pin, knife, straw, two small round cut outs, tapered spatula, white vegetable shortening and gum glue adhesive.
- I made my own gum glue adhesive using about 5 tbs cold water and a pinch of gum paste. Put the gum paste in the water in a container and let it set for an hour, I then used it to stick the eyes and nose on the faces etc.
- I cut the mouth using the face template I created and continued to work my way up.


- Once they were done, I left them out for ½- hour depending on room temperature. I stored them in an airtight container because I didn’t want them to dry out too much as they can break easily when sticking them on the cake.


- I made mine 3 weeks in advance.
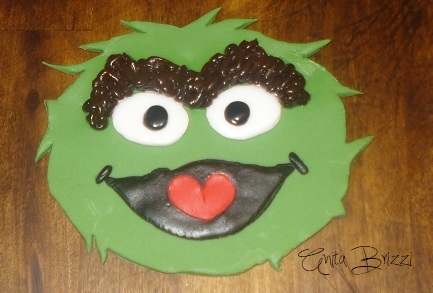
- Regarding Oscar’s eyebrows I used Queen’s Writing Fudge (Rich Chocolate) I found it easier than cutting out his eyebrows, plus it gave more of that rugged effect like Oscar. If you notice in the picture I had put it on a few days before but it sweated and was drooping a little so next time I would do it on the day.
- Finally, you can add them to the cake however you like. I used a bit of Wilton piping gel to stick mine on the cake. And here is the final result.


For some reason I was making other cakes at the same time. So when I
got to doing Noah’s name I got a bit tired and lazy, the writing was supposed
to be white but I made it yellow which didn’t give the same effect but
nevertheless he loved it. He would just stare at the characters for ages like
they were real, it was very cute.
Here is the last years cake with white writing.

Well, I think Sesame Street is out of my system now and I can try something
else for his birthday next year.
I apologise for my photos not being the quality but I think
they give the gist of how to do it.
Well, on my way to where the air is sweet J
LOVE Anita X
Looks amazing!
ReplyDelete