Showing posts with label Cake Decorating. Show all posts

Tuesday, 1 October 2013

Lots Of Chocolate Cakes

Hello Wednesday
Life has been very busy for us the last few weeks. We took a lovely family holiday in Sydney where Nathan and I drove 16 hours there and back dodging Kangaroos on the roads. 
A photo of nicer times with Kangaroos where we are feeding them instead of dodging them with our car!
 
Probably my favorite place in Australia Central Coast. Love it!

Back in Adelaide I made two birthday cakes for my sister (it’s complicated :)) and in between all that I got to take a ride in an ambulance after passing out (I can joke about it now). So it has been crazy to say the least.
For my sister’s birthday party with our family I made this Cadbury Block chocolate cake which I have made before. I had fun making it again!
The cake below was for my sister’s birthday party with her friends. It was fun to make but it turned out to be bit of disaster in the end.
 I made a Martha Stewart caramel sauce which was delicious but while we were transporting it to the party the layers in the bottom tier starting to slide! I have no idea why this happened I assume the caramel sauce melted making the cake slide. If anyone has any idea what went wrong I would love for you to leave a comment! Lucky I had made her a cake that stayed together the week before! lol

Happy Week Friends.
Anita x

God will never give up on you. He is always there for you. He endures every difficulty with you. He loves you.

Nicky Gumbel

Saturday, 17 August 2013

Learning to Croquembouche


Hello Lovely Friends,

I have always wanted to be able to make croquembouches and so I thought I would try and learn from searching the internet!

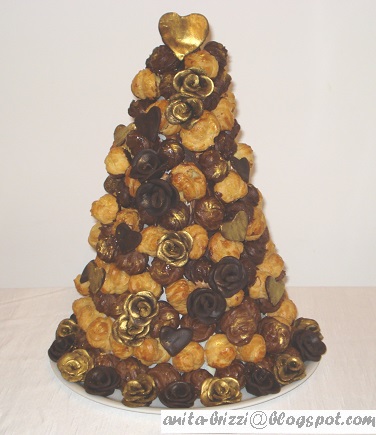
Here are pictures of my first two attempts.

The first one I made using a croquembouche cone which I left inside because I was too lazy to try and get it out.


Supposedly you can use the inside or the outside of the cone to construct the croquembouche.  I think next time I will use the inside of the cone.

The second one I made was constructed freehand as you can tell. J


I think with a few more practices I can get better. :) 

The really fun part for me though was decorating them with fondant. Next time I have to be more patient and let the croquembouche set before I decorate - I was very eager to see the end result!

Well, I will keep you updated on mastering the art of the croquembouches.

Have Fun!

'The happiest people don't necessarily have the best of everything. They just make the most of everything'
Nicky Gumbel.


Much Love Anita x

Sunday, 28 July 2013

Decorating Cupcakes Pink and Purple


Hello Lovely Friends, 

I was going through some old photos and found these cupcakes that I decorated with leftover pink and blue fondant. I wasn't really fond of this colour combination but I didn't want to waste the fondant so I practiced decorating cupcakes. 

I was working on my bows, roses and piping at the time... you probably can tell! Considering I didn't like either pink or blue fondant the cupcakes didn't turn out too bad I think! 

I also decorated a dozen cupcakes in white fondant on a separate occasion. 


Well, this is probably the shortest post ever. Oh I must mention that when I post recipes I supposedly always forget an ingredient here and there! Sorry! My lovely sister (Thanks Stef) trials a lot of the recipes I post and kindly reminds me what I fail to include in my recipes! So if a recipe doesn't turn out please be sure to email me.

‘If God knows about the little sparrow that falls to the ground, He knows about your cares.’ Greg Laurie

Have a great week friends, 

Love Anita x

Sunday, 30 June 2013

How to Sesame Street Cupcakes


Hi Friends,

So last week I made some Sesame Street cupcakes, which I have done a couple of times before, they are lots of fun and the kids love it. I am no professional but I think they turned out ok... well I was happy with Big Bird, Elmo and Cookie, but I think Grover and Oscar turned out better last time I made them, but Noah was still impressed with them. I jotted down some notes for those interested in making them and I added some pictures in case my steps aren’t that clear! J Enjoy.

 
Martha Stewart Cupcake Recipe:


This is my favourite cupcake recipe so far as I find them to be moist yet not too sweet like other cupcakes.

Donna Hay Chocolate Buttercream (Kid’s Magazine)
250 gm butter, softened
2 cups of icing sugar, sifted
2 Tbsp milk
  • Place the butter in the bowl of an electric mixer and beat for 6-8 minutes. Add the icing sugar, cocoa and milk and beat for a further 10-15 minutes.
  • Separate the buttercream into 5 equal portions and add the colours to make resemble sesame street characters.
Make sure all fondant is rolled and ready. Keep covered with a plastic freezer bag so it does not dry out.

After I added the buttercream to each cupcake I stored the cupcakes to set in the refrigerator for a few minutes so the buttercream would not run or get messy when it came to sticking on the eyes etc.

Elmo Cupcakes :
Wilton Red (Rojo Intenso) buttercream
Wilton Tip 18 or 21 (matter of preference)
Plastic drinking straw
Black and White fondant
Extra small circle cutter
Orange Baby Jelly Beans
  • Start from the edge of the cupcake and pipe your way around until the cupcake is covered.
  • Using the extra small circle cutter cut out white fondant to make Elmo’s eyes.
  • With a plastic drinking straw cut out black fondant to make the pupil. I used a little butter cream or drop of water to stick the pupil on the eye.
  • For Elmo’s mouth, cut out black fondant using a medium circle cutter, then within the circle you have cut, cut out a moon shape to use as Elmo’s mouth.
  • Add a jellybean in the centre below his eyes for his nose.

Oscar the grouch Cupcakes:
Wilton Moss Green (Verde Musgo) buttercream
Wilton Tip 3 or Inox Tip 1 (I would use Wilton tip 233 next time as my Oscar's came out looking more like a scary Oscar!) :)
Red, White, Black fondant
Queen’s Brown Writing Fudge
Extra Small Circle Cutter
Medium Circle Cutter
Plastic Straw
  • Starting from the edge of the cupcake, pipe your way around until the cupcake is covered.
  • For the eyes, cut white fondant circle with the extra small circle cutter.  To get the oval shape eyes, cut within the circle slightly off centre.
  • Cut a tiny circle in black fondant using the plastic straw, then cut that circle in half, use each half for his pupils and glue on his eye with buttercream or drop water.
  • Cut out black fondant with the medium circle cutter, and then cut in half using each half for mouth. (Next time I would make his mouth smaller - see picture below of previous ones I made, because it resembles Oscar more)
  • To make Oscar’s tongue use the extra small circle on red fondant and follow instructions to his eyes. Stick the red tongue with bit of buttercream on his mouth.
  • For Oscar’s eyebrows using the Queen’s chocolate fudge, pipe around his eyes, it doesn’t have to be tidy.
Grover Cupcakes:
Wilton Tip 18
Wilton Royal Blue buttercream (I added heaps of blue to get the Grover colour).
White, Red, Black fondant.
Mini pink M&Ms (I would use bigger M&Ms next time)
Small Circle Cutter
Medium Circle Cutter
Plastic drinking straw

  • Start from the edge of the cupcake and pipe your way around until the cupcake is covered.
  • For the eyes, cut white fondant circle with the extra small circle cutter.  To get the oval shape eyes, cut within the circle slightly off centre. (I would make his eyes smaller next time like in the picture below.)
  • Cut a tiny circle in black fondant using the plastic straw, then cut that circle in half, use each half for his pupils and glue on his eye with buttercream or drop water.
  • For Grover’s mouth cut black fondant using a medium circle cutter. Cut in half using each half for mouths.
  • To make the outline of his lips, cut red fondant using a medium circle cutter, then cut within that circle to get a moon shape or lip shape. See picture below.
  • Stick an M&M in the centre but touching the top of his lip.

Cookie Monster Cupcakes:
Wilton Tip 233
Wilton Royal Blue buttercream
Cookies (I used Yoyo biscuits)
White and Black Fondant
Small Circle Cutter
Plastic drinking straw
  • Starting from the edge of the cupcake, pipe your way around until the cupcake is covered. Make one side of cupcake higher than the other.
  • Using the tip 233 make short strands and cover the icing of cupcake. (I made mine too long, I had to give Cookie and Oscar haircuts! Lol)
  • Cut white fondant using a small circle cutter and roll in balls.  Stick his eyes on the fuller section of the cupcake.
  • Using a plastic straw cut black fondant for pupils. Stick them on so pupils are looking in different directions.
  • Stick a broken cookie where his mouth would be.
Big Bird Cupcakes: (these are the most tricky I made a few different types cos he always turned out like an angry bird! lol)
 
Wilton Tip 18
Wilton Lemon Yellow buttercream
Yellow fondant (For the beak, I coloured a little using Wilton Golden Yellow)
Red, pink, black and white fondant
Plastic drinking straw
Small circle cutter
  • Starting from the edge of the cupcake, pipe your way around until the cupcake is covered. See picture.
  • For the beak, cut two circles of yellow fondant with the small circle cutter. Roll each circle in a ball, and form the shape of beak with fingers.
  • Cut a triangle of red fondant the size the beak, and also cut a slightly smaller triangle of pink fondant.
  • Get the two beak yellow beaks you made, stick the red triangle and the pink triangle to form his tongue on one side of the beak, then attach the other beak and press one end down with fingers. (I had to cut the ends of my beaks off to get them to size as I made them too big.)
  • Cut two circles of white fondant using the extra small circle cutter and roll into balls.
  • Cut a tiny circle in black fondant using the plastic straw, then cut that circle in half, use each half for his pupils and glue on his eye with buttercream or drop water.
  • Cut pink fondant using the extra small circle cutter, and cut that circle into quarter. Then use to make eyebrows. (I flatten it a little more with a spatula so it’s quite thin and covers the eye.)
  • If you have leftover buttercream from cookie monster cupcakes use to make the outline of big bird’s eyelids.
Well, if you are interested in making Sesame Street cupcakes I hope this helps. J


Have a super week.

Blessings

Anita X

Monday, 17 June 2013

Hello Monday!

 
I can’t believe its the start of another week... so soon. Today, I don't know what to blog about. Does anyone have those days? For my own sanity I like blogging a couple of times a week but I can't think about what to write. :)
 
It's been crazy busy for us so my head is all fuzzy and I'm not thinking cleary today, so I thought I would just share these pictures I took about year and half ago when I first discovered cake decorating. These are my pride mock cakes!  I kinda went all out having fun and practicing cake decorating; it was all new to me back then. lol

Cake 1: I made this purple three tier mock cake as I wanted to try out this lovely Wilton violet colour and practice piping on the side of the cake. As you can see I need little more practice piping on the sides.  (lol) Of course it would be a lot easier if I had an angle turntable but as cake decorators know it can get a bit pricey so you just make do with what you have! J
 
 
Cake 2: I love the brush embroidery effect. It’s so pretty, so easy and fun to do.
  • Immediately after I covered the cake with fondant while it was still soft, I stamped the fondant with a flower cutter.
  • I used royal icing I had prepared in a piping bag with round tip and outlined the imprint.
  • With a damp brush, I brushed the outline of the royal icing, dragging the royal icing (long brush strokes) from the outline to the centre. The brush strokes should be visible.
  • I did this until completed the imprint.

 
Cake 3: I made this mock cake in a Wilton class I took. It didn’t look like this in the class as I changed it at home and made the roses fuller, using bigger circle cutters than the Wilton course recommended (they just looked too small). I used Wilton Creamy Peach colour and created three different shades to get the colours of the roses.
 
 
Had a lot of fun making these mock cakes although I don’t recommend it as it can be expensive. I can’t wait til my sister’s birthday where I can put to practice my cake decorating skills! Hope shes ok with it ;)

Lotsa love and blessings

You are a God of compassion and mercy, slow to get angry and FILLED with unfailing LOVE and FAITHFULNESS. Psalm 86:15

Anita xx

Monday, 10 June 2013

Buttercream Ruffles on cupcakes tutorial


Hi folks,
After my ‘Chocolate Ruffle Cake,’ post, I received a few emails requesting how to make them. I have been postponing the tutorial until I bought a better camera but as I have received a couple more emails requesting how to make the butter cream leaves from my post ‘Super Easy Gluten Free Cupcakes,’ I thought I would make a ‘mini how to’ with what I have now - my little old trusty digital camera. (Don’t worry, I am in the market for a new camera and if you have one your happy with please I would love to know about it. I could always use some advice!) J
So I put together two mini presentations on how to make them both. Being an amateur cake decorator I am just showing those who are interested what works for me. Unfortunately after several takes with my camera- hubby, the leaf demonstration video turned out a little blurry. But both give the overall gist of how I made the butter cream leaves and ruffles.

Due to camera shyness here are some things I failed to mention while filming. : )
  • I used Donna Hay butter cream.
  • I covered the cupcake prior to adding the butter cream with fondant, as I didn’t have enough butter to make more butter cream. It is important that you first cover the cupcake with either butter cream or fondant before adding your ruffles and leaves as they will not stick to the cupcake alone.
  • I used Wilton tip 352 for the leaves and Wilton tip 104 for the ruffles.
  • If you are interested in making the bigger ruffles like the ones I made for the ‘Chocolate Ruffle Cake,’ I used a Wilton tip 406.


So hopefully while it is of poor quality it does give an idea of how I made the ruffles and leaves for those who emailed me.

Mmmm and next time I will be sure to make notes to help with those camera nerves. LOL!

Please feel free to email me if you have any questions.

Have a super gorgeous week.

Love Anita x

Thursday, 6 June 2013

Oh another chocolate cake post! :)


Hello blogger beauties,
 
I hope you are having a super week. I just wanted to share some pictures of a cake I made for the staff at Noah’s day care.

Initially I didn't want Noah going to day care but due to this Crohn’s condition that seems to be lingering around me we decided that noah should go a couple of days a week so I could have some rest. But the first day care centre we enrolled him in made us feel all so miserable. He would cry so much that once he even came home with a blood shot eye which we assumed was from crying all day, oh it broke my heart! It was a really stressful time for me, because as a mum it’s already hard to leave your child in day care let alone when they are miserable there.

So after a year of no change we enlisted him in another day care centre and wow what a change! Now he is more than happy to go and in the last six months he has only cried twice and very briefly, all thanks to the loving staff who are really supportive, friendly and genuinely take an interest in him. So not only is he loving it, but so is mummy! Yay!

I think most moms get me when I say it never gets easy leaving your child in day care, so for me having people who truly care about Noah makes my day easier and more relaxing!

So I thought I would thank the staff and show them my appreciation by baking a lovely chocolate profiterole cake. I know! Another post on chocolate cake... it’s like my forth already. Lol! Ok I love chocolate! ;)

Here are recipes I used which I have tweaked here and there to suit my preferences. :)

Donna Hay Chocolate Buttermilk Layer Cake (Donna Hay Website)

( I have doubled the ingredients for an 8 inch cake tin because I like my cakes nice and high.)
  • 2 cup water
  • 250gm butter chopped
  • 70 grams cup cocoa, sifted
  • 4 cups plain flour, sifted
  • 4 cups caster sugar
  • 2 tsp bicarbonate of baking soda sifted
  • 4 eggs
  • 1 cup of buttermilk
Preheat oven to 160c.
Line an 8 inch cake tin with non stick baking paper.
Place the water, butter and cocoa in a saucepan over medium heat and stir until the butter has melted.
Place the flour, bicarbonate soda and sugar in a bowl, add the cocoa mixture and whisk to combine.
Add the eggs, buttermilk and whisk to combine.
Bake for 1 ½ hours or until cooked when tested with skewer.
Allow to cool in the tin for 10 minutes. 
Turn out onto wire rack to cool completely.

Donna Hay Chocolate Butter cream (Kid’s Magazine)
  • 250 gm butter, softened
  • 2 cups of icing sugar, sifted
  • ½ cup cocoa, sifted
  • 2 Tbsp milk
Place the butter in the bowl of an electric mixture and beat for 6-8 minutes. Add the icing sugar, cocoa and milk and beat for a further 10-15 minutes.

Chocolate Ganache
  • 200 grams of dark cooking chocolate chopped
  • ½ - ¾ cup of almond milk
Place the chocolate and almond milk in a microwave bowl and stir in intervals of 20 seconds until completely melted and combined.

My Mum’s (Anna Iagrossi) Choux pastry (Love these)
  • 120 grams of unsalted butter
  • 1 cup water
  • Pinch of salt
  • 1 cup plain flour
  • 3 eggs
Pre-heat oven to 160 decrees.
Place the water, butter and pinch of salt in pan over medium heat and stir until the butter has melted and is simmering.
While simmering, lower heat and stir in the flour until mixture comes together and leave the sides of the pan.
Transfer the mixture in a bowl of an electric mixture and beat on low for a minute or so.
Add eggs one at a time.
Combine each egg by placing mixer on a low setting, add the egg and combine for a few seconds, increase the speed and mix for a further minute. Repeat this process for other two eggs.
The mixture should be thick and a good sign is if a wooden spoon stays upright in the mixture.
Spoon the mixture onto two baking trays, leaving room for spreading.
One heaped teaspoon usually gives me cute little profiteroles. J


Donna Hay Creme Patissiere (Classic Book 2)
  • 2 cups of milk
  • 4 egg yolks
  • 1/3 caster sugar
  • 1/3 cornflour
Bring the milk to boil in saucepan over medium-high heat.
Whisk together eggs and sugar until thick and pale.
Add cornflour and whisk until combined.
Slowly pour the hot milk, whisking continuously.
Pour the mixture back in the saucepan over medium- high heat and simmer rapidly while whisking continuously for 5 minutes or until thick.
Place a piece of plastic wrap directly onto the surface of the cream to cover it and set aside in the refrigerator to cool.

Building the Cake
  • Once I layered and filled the cake with ganache I covered it with butter cream and let it set in the refrigerator for a while.
  • I drizzled the ganache starting from the centre so it would fall evenly on the sides.
  • And lastly I topped the cake with profiteroles I had pre-made and put shards of chocolate between them.
 
I do hope this makes sense as it is bit late and this is an unusually longer post! J

Well, as this week has been particularly hard in regards to my health I have been praying a lot. And I guess I would like to end this post with my personal thoughts to God lately that despite how I am feeling,  how hard my days are, or the prayers He has yet to answer,  As for me, I will always have hope, I will praise you more and more.’ Psalm 71:14

Anita x

Thursday, 30 May 2013

Super Easy Gluten Free Chocolate Cupcakes!


Hi lovely friends,

I just want to say there are so many fantastic blogs out there and I keep finding more. I wish I had more time to read them all!

Well, I have been busy trying to create a facebook page this week and it is taking me ages! Lol. All this technical stuff is all... well technical, so I am particularly slow at it! But you can check out my facebook page here, https://www.facebook.com/InspiredPassion?ref=tn_tnmn while in the meantime I try and figure out how to add the facebook widget on my blog.

Well, Monday I caught up with a lovely friend who I hadn’t seen in years and I was super excited and thought I would make her some gluten free chocolate cupcakes. But due to laziness I kinda ruined the taste of the cupcakes because I couldn’t be bothered breaking the chocolate apart to get what I needed! I added 250 g of chocolate instead of 220 g so they tasted a little on the bitter side but at least they were still edible. This recipe would have been a hit with me and my taste tester  (my husband) had my laziness not interfered!

The next day I thought I would practice my butter cream skills on the leftover cupcakes as I have my kitchen back from our little renovation. YAY! I practiced my rose, ruffles, leafs and just piping. I missed cake decorating! Here are the tips I used for decorating:

Ruffle - Wilton tip 104
Rose - Wilton tip 1M
Leafs - Wilton tip 352
Piping – Wilton tip 21 & 18


Donna Hay Modern Classics 2: Flourless Chocolate Cake Recipe
(Gluten Free)
  • 180gm butter, chopped
  • 220gm dark cooking chocolate
  • 1 ¼ cups caster sugar (I like to use raw caster sugar)
  • ¾ cup almond meal
  • 1 cup cocoa powder sifted
  • 5 eggs
Pre heat oven to 140 decrees

Place butter, sugar and dark cooking chocolate in a bowl and microwave stirring at 20 second intervals.

Place the almond meal and cocoa in a bowl and whisk in chocolate mixture. Add the eggs one at a time and whisk until well combined.
Grease 12 x ½ cup capacity non-stick muffin tins lined with paper cupcake cases. Spoon in mixture and bake for 30 minutes or until firm.

Donna Hay Chocolate Buttercream
  • 250 gm butter, softened
  • 2 cups of icing sugar
  • ½ cup cocoa
  • 2 tbsp milk
Place the butter in the bowl of an electric mixture and beat for 6-8 minutes. Add the icing sugar, cocoa and milk and beat until a further 10-15 minutes.


My quote for the day : Happiness is an inside job! (don’t know who quoted it though.)

Anita X

Friday, 10 May 2013

Chocolate Ruffle Cake


I love chocolate cake and seeing that I had leftover chocolate butter cream from a cake I made for customer I was certainly not going to let it go to waste. So I made another chocolate cake all for myself!

For the Cake I just used a Donna Hay chocolate cake recipe and for the chocolate butter cream I used Mich Turner’s chocolate butter cream recipe from her book ‘Cake Masterclass’ which is divine! Mich Turners chocolate butter cream recipe has a soft texture which is what I like because when I pipe ruffles I can never finish the cake by using a firmer butter cream as it hurts my hand to much!

I covered the cake in ganache and let that set in the fridge.

I then used a Wilton tip 406 to pipe the ruffles.
 
Oh and not too worry I ending up sharing the cake with my family.
 
Have a gorgeous day.


Anita X